⇒ One Test Tells Me Everything I need to know…
Testing in general terms means using a small sampling to determine the characteristics of a whole group. The smaller the sample, the larger the margin for error. It may not seem practical to have a line operator or quality technician run a statistically correct (n=20) sample group, but even three samples will triple the accuracy if a current procedure (SOP) only calls for one test. Go & No-Go testing included – all testing accuracy relies on a wider sampling.
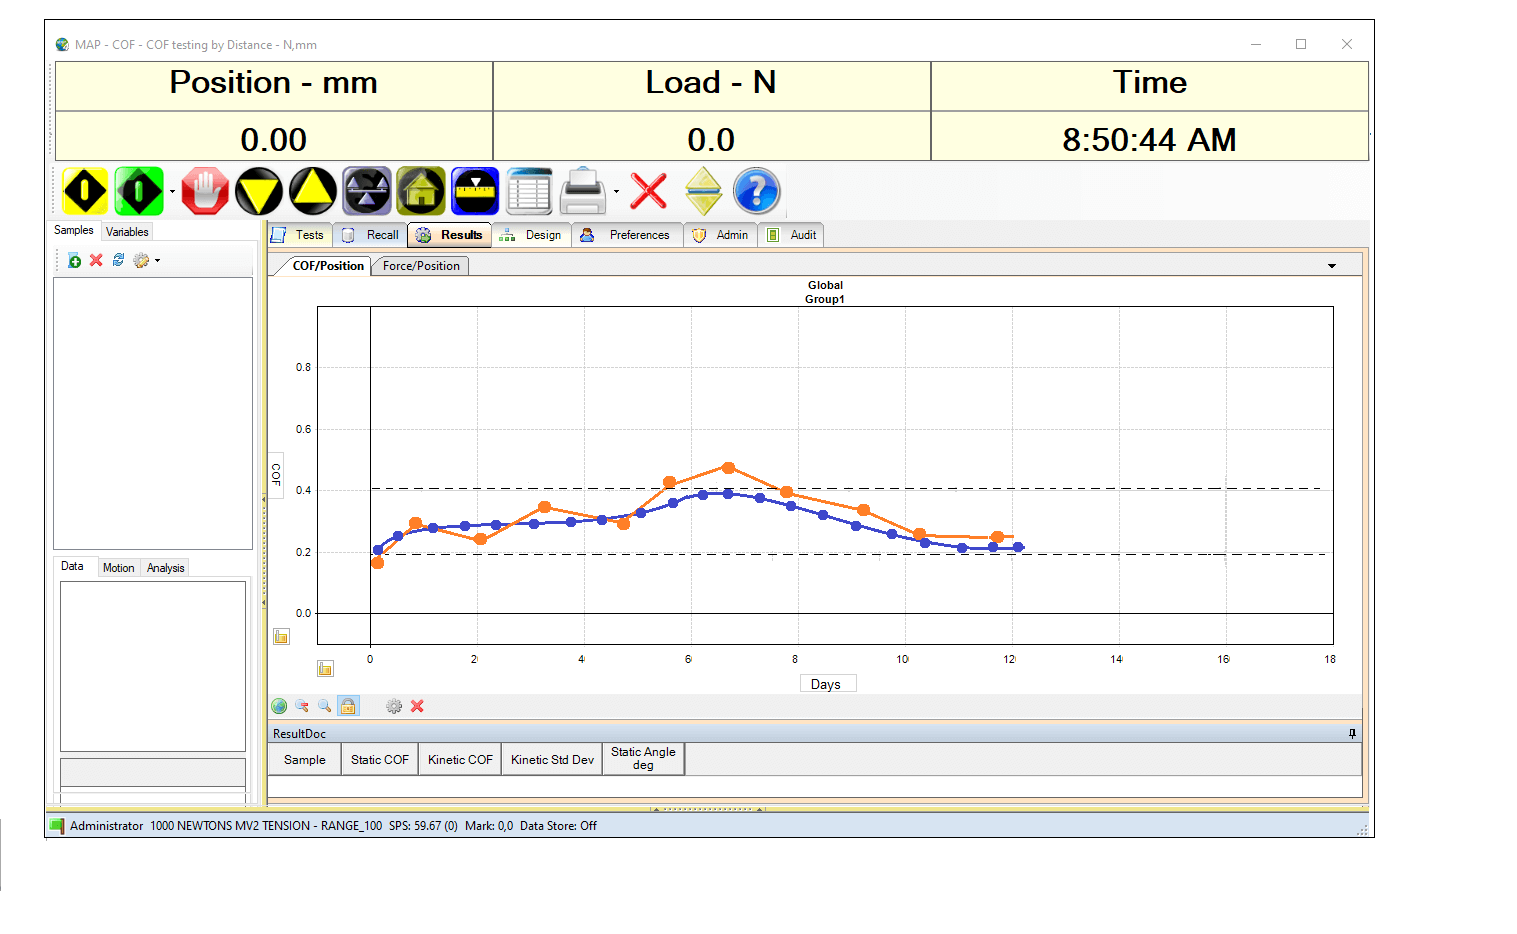
↓ This graph illustrates single vs. several COF tests on the same sample. ↓
Using the single test data, an operator might reject three lots (1st, 6th & 7th) while the average data using multiple tests indicates all samples were within specification or acceptable range.
⇒ Sample Preparation is a hassle!
If you want something done right, start at the beginning…all testing has a finite number of variables that impact your results. If there is not a uniform sample for your testing or there are flaws in the preparation and samples are different, testing is a wasted effort or even impossible. Sample preparation is often overlooked or not practiced accurately to set your laboratory up for success. Consider choosing the best tools to do the job right. The proper sample preparation tool should make this task safe, easy and accurate. Consistency is also key and following proper sample prep procedures every time is the first step to obtaining repeatable and reproducible test results.
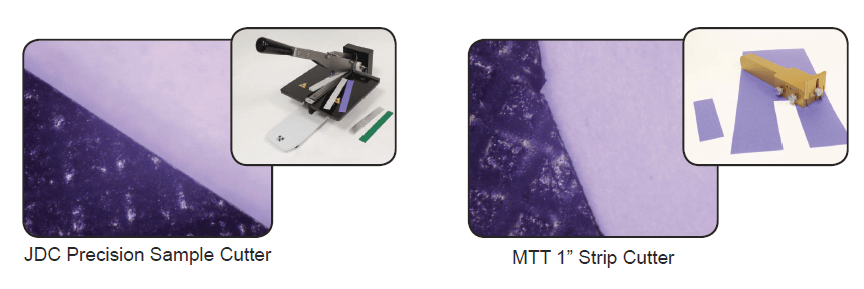
Inadequate sample preparation can lead to additional retesting and higher costs while improper tools can endanger operator safety. The selection of the optimal sample cutter depends on a few key factors including what material you are testing. Corrugated materials could be crushed with the incorrect tool, and plastic films may have jagged edges impacting your tensile results.
Consider these factors when choosing a sample cutter:
- The type of material being cut
- The required dimensions of the specimen
- Ease of use
- Repeatability and accuracy of the cut specimen
Read this study of the JDC Precision Cutter vs. the MTT Strip Cutter for preparing tensile test samples:
Read Here
⇒ Do I need to “Zero” before I run my test?
The universal rule of thumb is to start with a Force = 0.00 before loading a sample. Intentionally zeroing the instrument after a sample is loaded may remove actual tensile or compressive force that exists due to mechanical and physical properties of the test fixtures and sample material. When you zero the test before there is a load, it ensures the load cell starts at 0.00 before a sample is introduced to the instrument. Intentionally zeroing the instrument after a sample is loaded may affect both tensile and compression types of tests.
So why do we zero on the machine? There are a variety of reasons, but the most common reason to zero is due to a fixture or grip change or perhaps a new material. Zeroing after a sample is loaded directly affects results because the data captured during the test that follows does not include the force value previously erased by pressing the zero button. Accuracy is absolutely impacted by this causing the results to be skewed.
When in doubt, the only time you should zero is BEFORE the sample is loaded. Keep it simple:
- Do not zero the instrument once the sample is loaded.
- If you have any questions – see #1!
⇒ How do I know my results are accurate?
Are your laboratory instruments providing you the accurate measurement data you require? It is important to regularly verify an instrument’s measurement accuracy to determine if calibration is required. From a practical perspective, a “calibration due date” is a recommendation to validate and certify the measurement system. Mechanical property measurement instruments are designed to remain accurate unless physically damaged. If a materials test results are trending out of range, remember to confirm whether an instrument’s calibration due date is current or past due.
When it comes to your testing instruments and the investment you have made, it is important to keep up with routine maintenance to operate at peak performance. Regularly scheduled maintenance has been proven to reduce instrument downtime, minimize interruptions in your manufacturing process, limit waste due to quality issues and prevent inaccurate test results that can cost you money.
Click here to register your laboratory equipment for important service reminders.
Click here to learn more about preventive maintenance benefits.
⇒ Should I calibrate or verify my instrument?
Calibrate and Verify are not synonymous. Most instruments have a means of adjustment for calibration purposes. Verifying an instrument’s calibration does not involve adjustment. An operator taking measurements using standard materials and/or tools is verifying the instrument is reporting expected results. If results are beyond expectations (out of specified limits), adjustments are made to calibrate the instrument so measurements are within expected (published) limits.
The frequency for performing verification procedures is determined by the situation. Some companies choose to verify every shift, day, week or month. Materials and processes with high variability may require more frequent verification.
Proper verification procedures usually include:
- Certified tools/standards and/or materials
- Clearly written and illustrated procedures
- Historical log book